In this article
- Prerequisites
- Add a copilot to your Power Pages site
- Customize your copilot
Prerequisites:
To access the AI driven Power Pages Copilot functions, on Power Pages setup:
- Your setup should be within the regions of the United States, Europe, United Kingdom, Australia or India. Check out the locations for data storage and processing related to Azure Open AI and Bing search services.
- Make sure your browser language is set to US English.
- The admin of your tenant needs to enable the option to publish bots with AI capabilities, in the Power Platform admin center.
- Copilot utilizes responses generated by Microsofts Copilot Studio. For information refer to Copilot Studio Quotas & Pricing.
Add Copilot to Power Pages:
You can manually add a copilot by following below steps.
- Head to the Setup workspace.
- Navigate to Integrations. Choose to Add Copilot customization (preview).
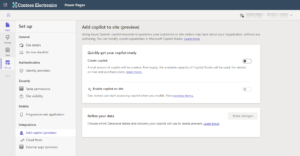
3. Activate the option, for Creating Copilot.
4. Power Pages will generate a Copilot with answers for you in Copilot Studios
5. To make the Copilot accessible to visitors and users enable the Copilot on the site.
If your tenant administrator has not enabled publishing of Power Pages Copilot with AI features the option to Enable Copilot, on site will not be available.
Customize your copilot:
When designing a co feature, for a website it leverages the content available on the hosting site to create responses. The Dataverse service helps in organizing site content and configured tables, which are then summarized by Copilot Studio to generate responses.
Users with access to the site receive customized and condensed answers that match their roles on the web. To enhance the content model for these users refine the data by following these steps;
- Start by opening the chatbot.
- In the “Refine your data” section click on the “Make changes” button.
- Use the “Choose tables lookup control” to pick or unselect tables.
- You can choose tables in this step. Make sure they are relevant, to your site.
- On pages specify where each table is used for generating citation URLs.
- Click on “Next.”
- In the “Choose table” section select a table that includes columns and page links you want to use. This table will only show up if it has at one line column.
- You can select one table at a time.
- Add page links by selecting the page where each table is utilized.
- Under Choose columns, select the list of columns that is used in page. ( Note: Only a column with multiline text is available to choose.)
- Select Next and review the selection.
- Choose Save to submit the changes.